Living on a farm has its perks -- and it's not so perks. Although I didn't take this picture, this little rabbit looks like one of the "Cottontails" that you see running all over on the farm. My dad refers to them as "his cottontails." He likes them because he says these little things pick out the very best hay in the stack and that is where they eat. I don't totally get that because many of you will recall a few years ago the big rabbit roundups in Idaho. The Cottontails, however, are not the same as Jack Rabbits and not as destructive to the hay.
Anyway, to get on with my story, yesterday there was a little one of these Cottontails on the porch step. However, it was no longer living. Whether a cat or dog saw to its demise I do not know. It made me sad, Austin had to come to the rescue and see that it was removed, I couldn't do it. My dad is in mourning over the loss of one of his precious cottontails. Should you see him, please give him your condolences.
Thursday, May 26, 2011
Wednesday, May 25, 2011
Canning aka Bottling
Last week I purchased extra Roma tomatoes through Bountiful Baskets. I love to can (or bottle) whichever term you prefer.
Most people say -- you can purchase it in the store and save yourself the time -- but I like it and I will keep doing it as often as I can. I remember helping my mother growing up canning and maybe that is why I still enjoy it now. My sister, Julie, and I have gotten together several times now and canned tomatoes, pickles, apple pie filling, jams, sweet pepper jelly, etc. Tomatoes are easy to put up and I love the taste so much better than the canned tomatoes at the store, and I also like knowing how they are done, who is in the kitchen when they are made (that would be me), and a whole list of obsessive compulsive things I could go into.
Here are some of the steps ... blanch them in hot water.
The skins will start to shrivel and pull away from the tomato which makes it ever so easy to remove the skin. I then put then in cold water in the sink ...
Each one has the skin removed and is then put into jars where I squish (I love squishing) as many tomatoes I can into the jar. I don't add any water to my jars because I am such a good squisher that the juice from the tomatoes fills up the jar. They are then processed in a boiling water bath ... and my finished project looks like this ...
Pints and quarts of whole tomatoes ready to be made into delicious recipes ... they are flavorful and tender and cook up ever so nicely. Some of my favorite recipes I use these in are --
**Taco Soup
**Lasagna (Try Pioneer Woman's lasagna recipe, it is to die for, as are all her recipes).
**Homemade spaghetti sauce (I use for spaghetti and a truly divine recipe I have for manicotti)
Just for the record, I didn't bottle all the tomatoes, a few fresh ones were kept and used during the week in tacos, salads and BLT's, the best ever. (Tomatoes, 9 grain bread and romaine for the sandwiches all came from Bountiful Baskets). They were so good I think I would have liked them even without the bacon.
If you have a favorite recipe that calls for tomatoes, please share. I would love to add more to my list. This post is making me want to cook ... but I have sewing to do ... the recipe posts are my sister's job ... (Keep up the good work Julie)
~Rhonda
Tuesday, May 24, 2011
Susan Branch Homemade Recipes Giveaway
What is your favorite cook book and why? Leave a comment and tell us about it. We will choose a winner from those comments. The winner will get this Susan Branch Homemade recipes book. It is filled with Susan's artwork, stickers, embellishments and pre-designed recipe pages. Come and check it out.
Monday, May 23, 2011
Bountiful Baskets
In case you haven't heard of Bountiful Baskets, and you live in any of the Western states, you need to check out www.bountifulbaskets.org, become a member and on Monday of each week you can order a basket online which you pick up on Saturdays. You can order one for each Saturday, or any Saturday of your choosing (if you don't want one every week). Each week is a surprise as you don't know what you are getting. There are also extras you can order such as delicious 9 grain bread or extra fruit and vegetables.
The baskets are picked up from a location where you may live, you can also volunteer to help with the organization of the baskets prior to the pickup time. The produce is inexpensive and some of the best I have ever had. It is nice to be able to get things that aren't always in season where you live. The only item I have received consistently in baskets I have purchased is romaine lettuce. This week there were apples, blackberries, artichokes, mangoes, cantaloupe, pineapple, peppers, cucumbers, tomatoes, corn on the cob ...
Sorry .. this cute little boy can't be purchased ...
This is one of my favorite things ... and if you aren't able to eat that much produce a week, I would suggest you find someone to split your purchase with, as there is always enough. It gives me something to look forward to on Saturday morning ... other than the fact I don't have to go to work.
Sunday, May 22, 2011
May scrap quilt
This month's scrap quilt is designed using leftovers from this quilt I made for a customer. She doesn't sew so she gave me the scraps.
Although there was not an abundance of fabric left over from this project, I wanted to use every little piece. So I cut the few scraps I had into even smaller 1 1/2 inch squares, I then cut 5" squares from a solid cream and stitched the 1 1/2 inch squares right sides on the diagonal of each corner of a 5 inch cream background square. This formed a triangle in each corner. When the squares were sewn together they formed these cute little offset squares -- I think they were happy to meet each other.
This was the result of their reunion ....
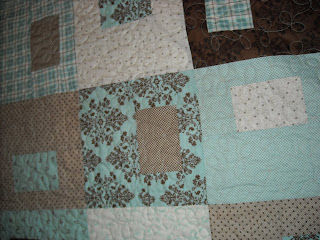
It has taken me a little while longer than I thought it would to piece this together. And -- as if that wasn't enough, when I was trying to determine how to use some more scraps to sew the back, this was the result ...
I now have a sweet little quilt for a baby in aqua and brown that could be for a boy or girl -- and if you don't like one side, just flip it over and use the other.
Better get back to sewing. Next month's scrap quilt won't be a baby size and there's lots of cutting and stitches and triangles and squares ... stay tuned!
Thursday, May 19, 2011
Chocolate, Chocolate Chip Cookies.......
One of our very favorite treats to make is Chocolate Chip Cookies. We call them Chocolate, Chocolate Chip because we use Milk Chocolate and Semi-Chocolate Chips. When I make these cookies, I have to keep my husband and children out of the kitchen or there would not be enough cookie dough left to actually make cookies. This recipe is so easy to make and I love that the outside is a little crisp, but you bite into a very moist, soft cookie. Preheat oven to 350 F.
Sift the flour, baking powder, baking soda and salt into a separate bowl.
1 1/3 cups all purpose flour
1/2 teaspoon baking powder
1/2 teaspoon baking soda
1/2 teaspoon salt
1/2 cup butter at room temperature
1/2 cup granulated sugar
1/2 cup packed light brown sugar
1 large egg at room temperature
1 teaspoon pure vanilla extract
1 1/2 cups chocolate chips (I use both Milk and Semi-Sweet, but whatever you prefer)
3/4 cup walnuts optional
In a large bowl, using a mixer, cream the butter until fluffy. Add the granulated and brown sugar and mix until the mixture is no longer gritty. Add the egg and vanilla and continue to mix, occasionally scraping down the sides with a rubber spatula. Add the flour mixture to the butter mixture and mix on low speed or use a wooden spoon, just until flour is incorporated. Add Chocolate Chips and Walnuts if desired.
With dampened hands, shape the dough into 1 inch balls or use a cookie scoop. I like to bake with parchment paper because it helps the cookies to not stick to the cookie sheet. Bake for 11 minutes, cookies will not look all the way baked, so let them rest on the cookie sheet for a few minutes until they are done. I would say let them cool completely and serve, but in my house the cooling process does not exist. Julie
Introducing Susan Branch Cookbooks & Our Next Giveaway!
Several years ago, I came across some cookbooks by Susan Branch. I was instantly in love with her art and her writing and the passion in her stories and cooking. My friend Jami and I used to buy her cookbooks and make several recipes from them. I miss you Jami!! What I love the most about Susan's cookbooks is that all of the pictures in the cookbooks are watercolors done by Susan. All of the writing is also watercolor. Susan always loved to cook, but she also had a desire to learn to watercolor. One year she was given a gift certificate to an art store, so she bought some watercolor supplies. When Susan went home and starting painting, she realized quickly that she had a talent already for watercolor. Her cookbooks are filled with brilliant ideas, amazing food and stories of her growing up. I have so many recipes that I use weekly that come from her cookbooks. So when I saw a Homemade recipe book that has her artwork in it and all you have to do is fill in the recipe, I had to get 3 of them. One for my sister Rhonda, who also loves Susan Branch's cookbooks, one for myself, and one to giveaway on the blog. I hope the winner enjoys!
This Susan Branch homemade recipe book is so fun. It is filled with recipe cards, stickers and sections that you can keep your recipes in. It is like creating your own cookbook and had Susan's amazing watercolors on all of the pages. Julie
Sunday, May 15, 2011
Vegetable Tree
Growing up, my mom used to make vegetable trees all of the time. She takes a styrofoam tree and attaches lettuce all down the tree to cover the styrofoam. What is nice about this tree, is you can add as many or as little vegetables as you like. My mom just uses toothpicks to insert the vegetables into the tree. It makes a great centerpiece at a party!
Thursday, May 12, 2011
Work in progress - layer cake
I have a new layer cake from Moda Fabrics called "Chrysalis" by Sanae. All of these pretty 10" square are now cut up into 2" and 4" squares, a few of the blocks are sewn and laid out on my design floor, it needs a few finishing touches before it goes on the quilting machine. Here is a sneak peek ...
I love the orange, brown, green, turquoise and creams. There are lots of butterfly designs out on the market this spring. The next big decision is to add a border or not -- after 3 days I have decided it needs a border -- when the fabric arrives I will finish the sewing and quilting. In the meantime, use your imagination for all the possibilities -- I always am ;o)
Rhonda
Tuesday, May 10, 2011
Mother's Day Treats
This year was an extra special Mother's Day. Trevor and Jasmine blessed their beautiful new baby girl and lots of family members from both sides of family gathered together to celebrate the special event. I chose to make the desserts. I started with a couple of favorites -- Austin loves these lemon bars, brownie bites for the brownie and chocolate chip cookie lovers, the cupcakes were a big hit with the kids and I tried a new recipes for Twix Bars (I think Austin is loving these too).
Lemon Bars |
Strawberry Cupcakes with Marshmallow Flowers
Twix Bars, Brownie Bites
And for my favorite sister, Julie, this little rectangular plate with the Twix Bars on it I bought for you. It has green stripes around the edge and some really pretty flowers in the center that are a dark pink color. Maybe someday I will remember to give it to you -- after I use it a few times.
Monday, May 9, 2011
Streusel-Topped Blueberry Muffins
I have always been a die hard Betty Crocker Blueberry Muffin fan. I have tried other box mixes and have a few recipes from scratch without success. It never fails I go back to the grocery aisle and get another box of Betty Crocker -- until NOW! This recipe is wonderful and you definitely need to try it.
Just look at them -- aren't they just calling your name? I'm thinking I should make a batch tonight. Or -- in case you didn't spoil your Mother, spouse, child or neighbor for Mother's Day make up for it this coming weekend by making these.
You'll thank yourself and your home will be a better place! Trust me.
1 3/4 cup all-purpose flour
2 3/4 tsp. baking powder
3/4 tsp. table salt
1/2 c. sugar
2 tsp. grated orange or lemon peel
1 large egg
3/4 c. buttermilk
1/3 c. canola oil
1 c. fresh or frozen blueberries
1 Tbsp. flour
1 Tbsp. sugar
Streusel Topping
1/4 c. sugar
2 1/2 Tbsp. flour
1/2 tsp. cinnamon
1 1/2 Tbsp. butter
Preheat oven to 400 degrees. Lightly spoon the flour into measuring cups and level with a knife. Combine flour in a large bowl with the baking powder, salt, sugar, and citrus peel (I used orange peel in this recipe). Make a well in the center of the mixture. In a smaller bowl, whisk together the egg, buttermilk, and oil. Add to the dry ingredients, stirring just until moistened.
In a small bowl combine the remaining flour and sugar and then toss the blueberries in this mixture until they are well-coated. Gently fold the blueberry mixture into the batter. Spoon the batter into lined muffin tins, filling 2/3 full.
To make the streusel topping, combine the sugar, flour, and cinnamon. Cut in the butter with a pastry cutter or two butter knives until the mixture is crumbly. Sprinkle over the batter and bake for 18 minutes or until the tops are golden and a toothpick inserted into the center of one of the muffins comes out clean. Remove from oven and allow to cool in the pan for 5 minutes and then transfer to a cooling rack. Makes 12 muffins.
A couple of things to remember -- if you don't have buttermilk make your own. Add 1 Tbsp. white vinegar to 1 cup of milk and wha laa -- I never buy buttermilk anymore.
I used orange peel in this recipe but can't wait to try the lemon soon. All you need is a little zester, this is a handy dandy kitchen tool no kitchen should be without. I use it quite often when I make a recipe that calls for any citrus peel.
I used fresh blueberries and they are just bursting -- but frozen would work just as well and several bags are waiting in the freezer to make more of these delicious delights.
Just look at them -- aren't they just calling your name? I'm thinking I should make a batch tonight. Or -- in case you didn't spoil your Mother, spouse, child or neighbor for Mother's Day make up for it this coming weekend by making these.
You'll thank yourself and your home will be a better place! Trust me.
Tuesday, May 3, 2011
Chicken Pot Pie
This Chicken Pot Pie is so easy to make and is absolutely delicious!!
1 1/2 pound cooked diced chicken breast
1 cup diced carrots
4 celery stocks diced
1 yellow onion medium (chopped)
1 cup frozen peas (thawed)
1/3 cup all-purpose flour
1/4 teaspoon ground black pepper
1/2 tsp. kosher salt
1/4 tsp. celery seed
1 8 inch unbaked pie crust
1/3 cup butter
1 can chicken broth
1 cup milk (preferably 2% milk or whole milk)
I dice my carrots small and saute them because I like them to be a little firm. Preheat oven to 400 F.
In a saucepan, over medium heat, add 1/3 cup butter, then your diced carrots, celery, onion, salt, pepper, celery seed, and sprinkle the flour over your saute vegetables and stir.. Saute until onion is translucent and carrots are tender then add your thawed peas. Slowly stir in chicken broth and milk. Simmer over low heat until thick. Remove from heat and stir in your cooked diced chicken.
Pour chicken and vegetable mixture into either a deep pie dish, or a round casserole dish. I only use a pie crust on the top. I found this very cute chicken template at a kitchen supply store and they are only $3-4. It makes the cutest pies or pot pies, and it is a great treat for your family or friends. I got this bird template for my sister, and after I showed her, I put it in my bag....So Rhonda, I have your used template and it works great!
Last but not least, place your unbaked pie crust on top of your chicken and vegetables and fold over edges. Cut 3 slits in top of pie crust so that steam can escape.. I beat an egg with 1 Tablespoon of water and brush on top of my crust so it will get nice and golden brown. Bake for 30-35 minutes. Cool for 5-10 minutes before serving. Then enjoy! Julie
Sunday, May 1, 2011
May Charm Quilt
It's a new month and time for more quilts ... I'm behind on the scrap quilt so the charm quilt is getting posted first this month. There is hope for summer as there is some green grass poking up in this picture. I don't know if I am more excited about the quilt or the grass and the fact it was nice enough to actually take a photo outside.
May's charm quilt was made using another Moda fabric line called "Oh My" by Sanae. I can't decide if the fabric has a retro or modern look but I wanted the quilt to actually have a vintage look so I used a pale yellow background fabric. I made the pattern up myself (and had to have some input from my mother as to the layout when it came to the diagonal rows).
For the quilt back I used a dot rather than a floral with a darling fuchsia for binding. And below you can see the floral pattern I quilted into the pinwheels.
Happy May!
Carrot Cake
Drum Roll please .....
For Easter Sunday I, that would be me, Rhonda, made a two layer carrot cake for dessert! Julie and I seem to have this continual blog battle as to cake baking (in case you haven't already noticed).
It turned out pretty darn nice, it had lots of yummy nummy cream cheese frosting and I added a little
green glitter crystals for color.
Somebody in our house enjoyed it because a couple of days later it was all gone.
Subscribe to:
Posts (Atom)